User Manual Content Export Tool
User Manual Content Export Tool
Version: 6.0.x - 6.1.0.
Publishing date: 2015-11-04
Contents |
Introduction
This document describes how the Content Export Tool works and how to use it. The Process Platform comes with a series of tools meant for administration and maintenance, the Content Export Tool is one of them.
This document covers Content Export Tool in version 6.0.x and 6.1.
The Process Consultant uses the Content Export Tool to export Process Platform content from a server and package the output to a zip file.
The zip output can then be placed on the destination server in the ImportFolder, where an import service handles the content import.
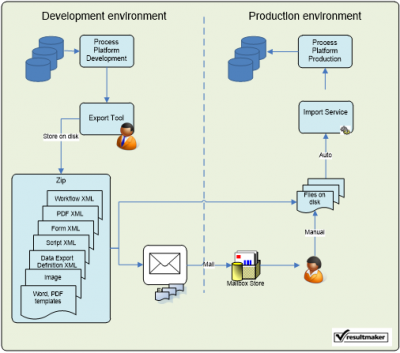
Content deployment flow
The Content Export Tool is a Windows desktop application installed on the Process Consultants PC or on the Process Platform server. In either case a Process Consultant or a System Administrator uses the tool to export content from a source server – typically a development or staging server – and store the zip file output on disk.
The zip file is then be placed in the ImportFolder on the destination server – typically a production server - and the Import Service on that server takes care of the content import. This is show in “Content deployment flow”.
The normal flow for the Process Consultant is like this.
- Start the Content Export Tool
- Load a Process Platform Server, by specifying the server name, your username and password
- Click the Load button, to connect to the server.
- Write the ID of the content you wish to export in the content input box.
- Select the type of the content in the type selector.
- Click on the Export button.
- Click on the Save button to save the content to a zip file.
Content Export Tool walk through
This section describes the application functionality of the Content Export Tool.
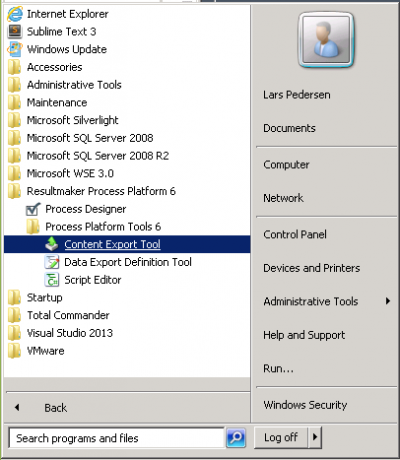
The tool is started from the Start menu and is located in Process Platform Tools 6 under Resultmaker Process Platform 6.
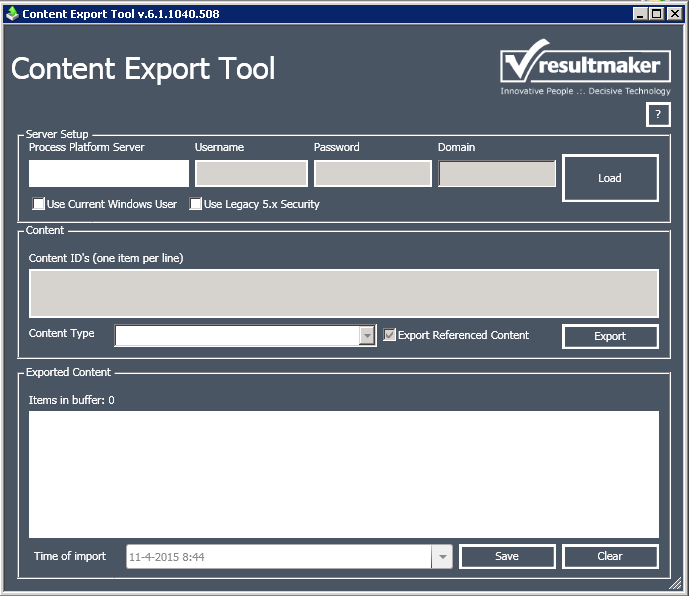
The application consists of the following sections.
- Server Setup
- Content
- Exported Content
Server Setup section
This section is used to login and set up a connection to a server.
To connect to a server, specify the server name in Process Platform Server field and hit Load. This will use the default Use Current Windows User login mode, which takes the credentials from the currently logged in user and send these to the server.
The Use Current Windows User login mode will work in the following scenarios:
- When the Content Export Tool is installed and used on the same server that is specified in the Process Platform Server field.
- When the Content Export Tool is installed and used on another machine than the Process Platform Server but both machines are on the same domain.
Both scenarios require that the user has access to the destination server.
In a scenario where the Content Export Tool is installed and used on another machine than the Process Platform Server and the two machines are not on the same domain, it is necessary to specify credentials for a user, which has access to the Process Platform Server.
This is done by disabling Use Current Windows User mode whereby the Username, Password and Domain fields in the Server Setup section are enabled and supplying the corresponding values.

Note: Do not use the Use Legacy 5.x Security mode, it is not supported in Process Platform 6.0.5310 and later.
Content section
In the content section, the content elements to export are specified.
Content elements can be of various content types. The type of content can be selected in the Content Type selector drop down box. Select the type of content corresponding to the item ID you specified.
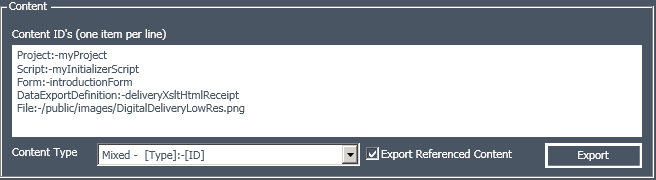
In the Content ID’s input box, it is also possible to supply the type, so that it is not necessary to select the type explicitly. This is done by writing the type of the content item and the ID of the content item separated by the characters “:-“. For example to export the project with the ID myProject the Content ID is specified like this: Project:-myProject
When doing this, select the Mixed mode type in the drop down box below the content input field.
This has the effect that it is possible to export content of different types in one go. Here is an example where a project, a script, a form, an export definition and a file from the FileRepository are exported at the same time.
Exported Content section
The Exported Content section gives an overview of the export and it is here that the zip file is saved.
Part of the overview is a text displaying how many items that have been exported and an export log consisting of a list of the exported content items and the corresponding export status. The status includes a count of export errors and warnings.
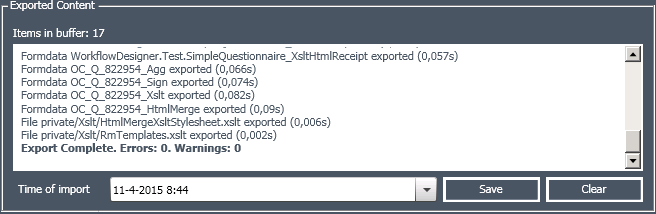
When performing the exporting operation, the items are stored in a buffer in the memory until you choose to save to disk.
If you click on Clear, the buffer will be emptied. When you click on Save, you will get a dialog, in which you can select where to save the exported items. The items are compressed and saved in a zip file.
It is possible to specify a Time of import. This is a signal to the Import Service, which will wait until the time of import is reached, before the content is imported. This is practical if an unattended content deploy is needed at night.